
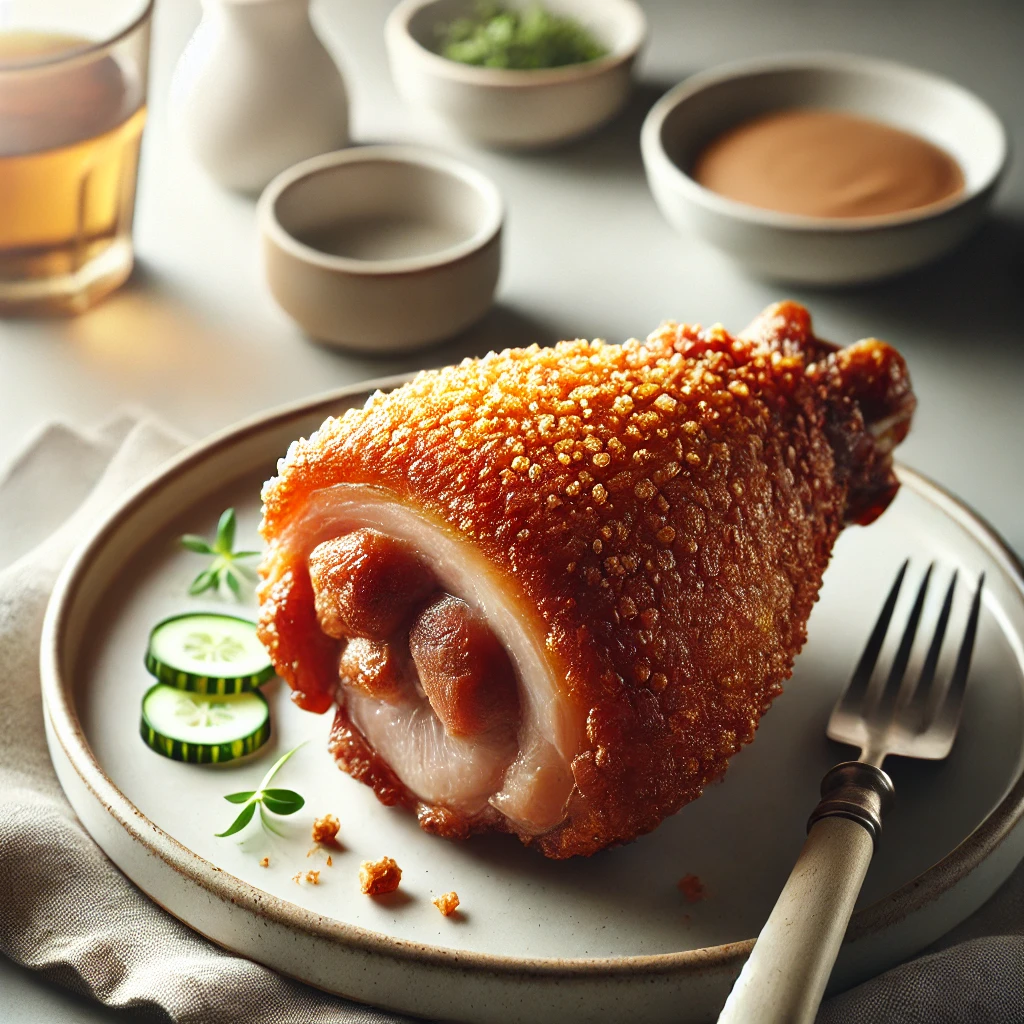

Have you ever dreamed of biting into a piece of pork so crispy it crackles, yet so tender it melts in your mouth? If so, let me introduce you to the Filipino culinary masterpiece known as Crispy Pata. This dish is not just food; it’s an experience that tantalizes all your senses and leaves you craving more.
Crispy Pata, which translates to “crispy pork leg” in English, is a beloved Filipino dish that has captured the hearts (and stomachs) of food lovers around the world. It’s a harmonious blend of textures and flavors – crispy on the outside, juicy on the inside, and bursting with savory goodness that will make your taste buds dance with joy.
While this dish is undeniably indulgent and not for the faint of heart, it’s a true celebration of pork in all its glory. It’s perfect for special occasions, family gatherings, or when you simply want to treat yourself to something extraordinary. Be warned, though – once you’ve tasted Crispy Pata, you might find yourself dreaming about it for days to come!
Recipe Ingredients
Before we dive into the cooking process, let’s gather all the ingredients we’ll need to create this pork perfection. Here’s a comprehensive list:
| Ingredient | Quantity |
|---|---|
| Whole pork leg (pata) | 1 (about 3-4 lbs) |
| Water | 8 cups |
| Salt | 2 tablespoons |
| Whole black peppercorns | 1 tablespoon |
| Bay leaves | 3 |
| Garlic cloves, crushed | 6 |
| Onion, quartered | 1 large |
| Soy sauce | 1/4 cup |
| Vinegar | 1/4 cup |
| Vegetable oil for deep frying | As needed |
For the dipping sauce:
| Ingredient | Quantity |
|---|---|
| Soy sauce | 1/4 cup |
| Vinegar | 1/4 cup |
| Garlic, minced | 2 cloves |
| Red chili, finely chopped | 1 |
| Sugar | 1 teaspoon |
Recipe Instructions
Now that we have all our ingredients ready, let’s walk through the process of creating this crispy, juicy delight step by step.
Step 1: Prepare the Pork Leg
- Clean the pork leg thoroughly, removing any hair and trimming excess fat.
- In a large pot, combine water, salt, peppercorns, bay leaves, garlic, and onion.
- Add the pork leg to the pot and bring to a boil.
- Reduce heat and simmer for about 1-1.5 hours or until the meat is tender but not falling off the bone.
- Remove the pork leg from the pot and let it cool completely.
Step 2: Marinate and Dry
- In a small bowl, mix soy sauce and vinegar.
- Rub this mixture all over the cooled pork leg, ensuring it gets into all the crevices.
- Place the marinated pork leg on a wire rack and refrigerate uncovered overnight or for at least 8 hours. This step is crucial for drying out the skin, which will help achieve that perfect crispy texture.
Step 3: Fry to Crispy Perfection
- Remove the pork leg from the refrigerator and let it come to room temperature.
- In a large, deep pot or wok, heat enough vegetable oil for deep frying (the oil should be about 3-4 inches deep).
- Carefully lower the pork leg into the hot oil. Be cautious as the oil may splatter.
- Fry the pork leg for about 10-15 minutes, turning occasionally, until the skin is golden brown and crispy.
- Remove from oil and drain on paper towels.
Step 4: Prepare the Dipping Sauce
- In a small bowl, combine soy sauce, vinegar, minced garlic, chopped chili, and sugar.
- Stir well until the sugar dissolves.
Step 5: Serve and Enjoy
- Transfer the Crispy Pata to a serving platter.
- Serve immediately with the dipping sauce on the side.
Recipe Tips & Variations
Creating the perfect Crispy Pata is an art, but with these tips and variations, you’ll be well on your way to becoming a master:
- For extra crispy skin: After boiling and marinating, you can rub the skin with a mixture of salt and baking powder before refrigerating. This will help draw out more moisture and result in even crispier skin.
- Healthier option: If deep-frying isn’t your thing, you can achieve a similar result by roasting the pork leg in a very hot oven (450°F/230°C) for about 1 hour, or until the skin is crispy.
- Flavor variations: Experiment with different marinades. Try adding lemongrass, ginger, or five-spice powder for unique flavor profiles.
- Serving suggestion: Crispy Pata is often served with a side of pickled papaya (atchara) to cut through the richness of the pork.
- Storage: While Crispy Pata is best enjoyed fresh, leftovers can be stored in an airtight container in the refrigerator for up to 3 days. Reheat in a 350°F (175°C) oven to restore some of the crispiness.
High-Quality Photos
[Note: As an AI language model, I cannot generate or include actual photos. In a real blog post, this section would include high-quality, appetizing photos of the finished Crispy Pata, as well as step-by-step photos of the cooking process.]
Nutritional Information
While Crispy Pata is undoubtedly a delicious treat, it’s important to note that it’s a high-calorie, high-fat dish. Here’s an approximate nutritional breakdown per serving (assuming the pork leg serves 6):
| Nutrient | Amount per Serving |
|---|---|
| Calories | 650-750 |
| Total Fat | 45-55g |
| Saturated Fat | 15-20g |
| Cholesterol | 150-180mg |
| Protein | 50-60g |
| Carbohydrates | 2-5g |
| Sodium | 800-1000mg |
Please note that these values are estimates and can vary based on the specific cut of pork and cooking methods used.
Conclusion
Crispy Pata is more than just a dish; it’s a celebration of Filipino cuisine and the art of transforming simple ingredients into something extraordinary. The contrast between the crispy skin and the tender, juicy meat is nothing short of magical, creating a sensory experience that’s hard to forget.
I remember the first time I tasted Crispy Pata at a local Filipino restaurant. The sound of the crispy skin cracking as I bit into it, the rich flavors exploding in my mouth, and the satisfaction of pulling tender meat off the bone – it was a culinary epiphany that left me in awe of the magic that can happen in a kitchen.
Now it’s your turn to experience this magic. Don’t be intimidated by the process – with a little patience and attention to detail, you can create restaurant-quality Crispy Pata right in your own kitchen. And trust me, the results are well worth the effort.
I encourage you to give this recipe a try and share your experience. Did you achieve that perfect crispy skin? Did you try any variations? I’d love to hear about your Crispy Pata adventure!
And if you enjoyed this recipe, why not explore more Filipino classics? From adobo to sinigang, there’s a whole world of flavors waiting for you to discover. Stay tuned to our blog for more exciting recipes that will take your taste buds on a journey around the world.
Remember, cooking is all about experimenting and having fun. So roll up your sleeves, fire up that stove, and let’s make some Crispy Pata magic happen!
Additional Elements
Related Recipes:
- Lechon Kawali (Pan-Roasted Pork Belly)
- Adobong Baboy (Pork Adobo)
- Sisig (Sizzling Pork Face)
Serving Suggestions:
Crispy Pata is typically served as a main dish and is perfect for sharing. Serve it with steamed rice and a side of pickled papaya (atchara) for a traditional Filipino meal. You can also pair it with a light vegetable side dish like stir-fried bok choy or a fresh green salad to balance out the richness of the pork.
Equipment Recommendations:
- Large pot for boiling
- Deep fryer or large, deep wok for frying
- Meat thermometer (to ensure the pork is fully cooked)
- Wire rack for drying the pork
- Heavy-duty tongs for handling the pork leg
Historical Context:
Crispy Pata, while now a staple in Filipino cuisine, is believed to have originated in the 1950s. Legend has it that the dish was created by accident when a restaurant owner deep-fried leftover pork leg from a stockpot. The result was so delicious that it quickly became a menu staple and spread throughout the Philippines. Today, Crispy Pata is enjoyed not only in the Philippines but in Filipino communities and restaurants around the world.
Disclaimer: This recipe involves deep-frying and handling large cuts of meat. Please exercise caution and follow proper safety procedures when cooking. The nutritional information provided is an estimate based on available data. If you have specific dietary requirements or health concerns, please consult with a healthcare professional before preparing this dish. If you notice any inaccuracies in this post, please report them so we can correct them promptly.
